A Step-by-Step Guide, plus more fun ideas
Halloween is a time for spooky decorations, haunted themes, and all things eerie. If you want to add a unique and eye-catching element to your Halloween decor this year, a DIY Halloween snake wreath is the perfect craft project. With its creepy yet stylish appeal, a snake wreath offers a fun, budget-friendly way to make your home stand out during the spooky season. Follow these simple steps to create your own snake wreath and give your Halloween decor a terrifying twist.
Materials You Will Need
Before starting your project, gather the following materials:
- Wreath form: Choose a standard foam or grapevine wreath form as your base.
- Plastic snakes: You can find plastic snakes in various sizes at dollar stores, toy sections, or craft stores.
- Spray paint: Black and metallic gold or silver paint work best, but you can choose colors based on your desired theme.
- Hot glue gun and glue sticks: To securely attach the snakes to the wreath.
- Floral wire (optional): For added support if the glue doesn’t hold certain snakes in place.
- Ribbon or hook: To hang the wreath once it’s finished.
Step 1: Choose the Right Wreath Form
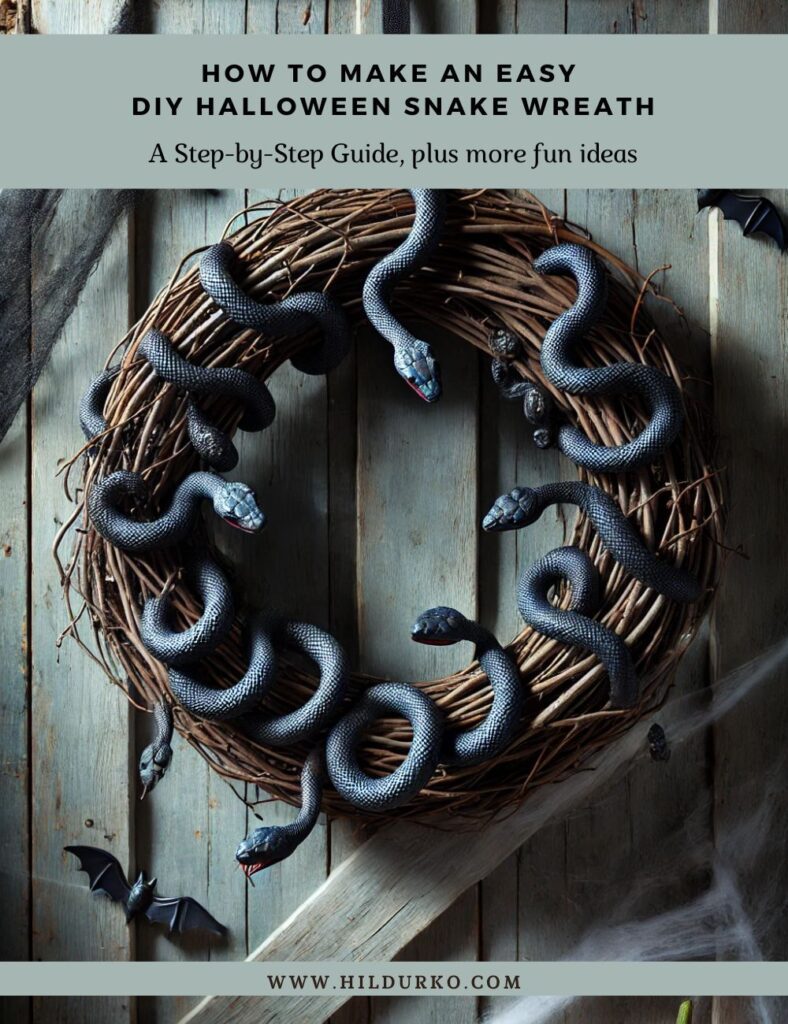
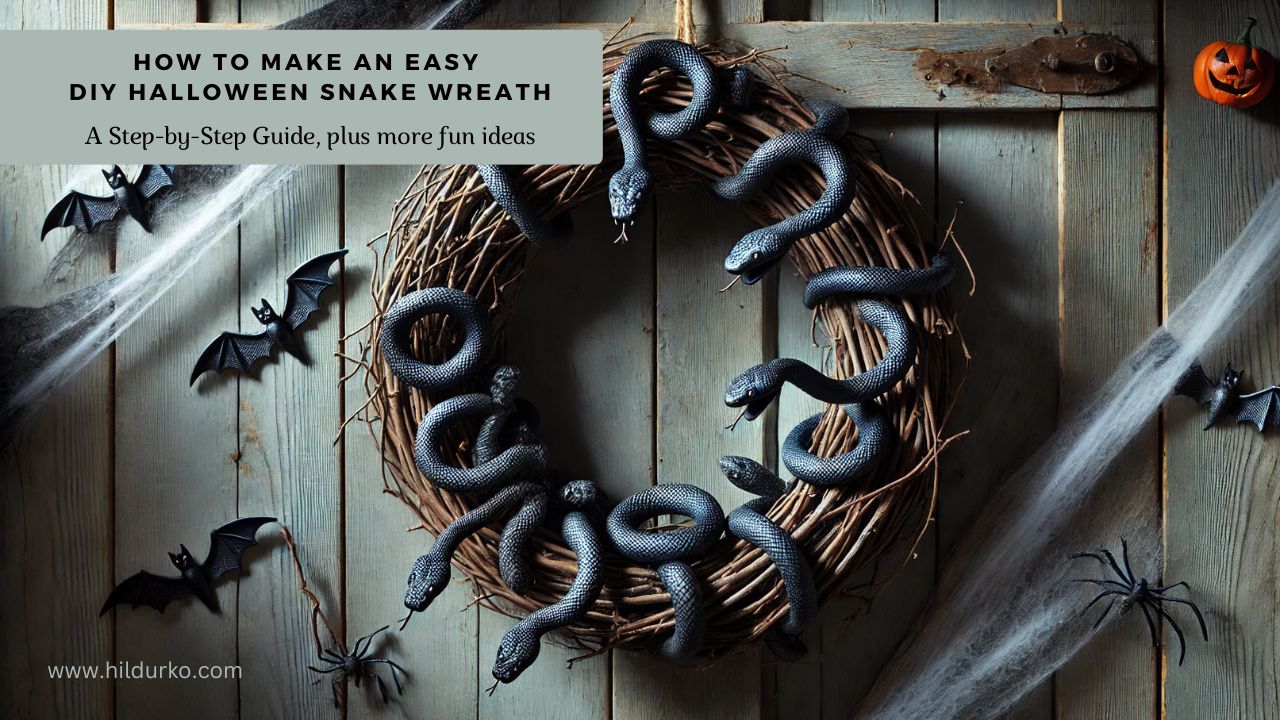
Selecting the right wreath form is the first and most important step. Foam wreaths are lightweight and easy to work with, but grapevine wreaths offer a more rustic, natural look. Either option will work, but foam is easier to paint if you’re aiming for an all-over monochromatic look.
The size of the wreath form depends on how large you want the final product to be. A standard 12- or 14-inch wreath form is a good size for most doors, but feel free to choose a larger or smaller one depending on your preference.
Step 2: Prepare the Snakes
Now that you have your base, it’s time to focus on the snakes. You can use any plastic snakes, but varying the sizes will give the wreath more visual interest. Before attaching the snakes to the wreath, consider how you want them positioned. Some could be coiled, others stretched out, with a few possibly wrapping around each other for added creepiness.
You may need to cut some snakes in half or reposition their heads and tails to create a more dynamic look. If you’re working with flexible plastic snakes, bending them into shape before attaching them can give your wreath more life-like movement.
Step 3: Paint the Wreath and Snakes
To give the wreath a cohesive and spooky look, you’ll want to spray paint both the wreath form and the snakes. Lay down some newspaper or a protective covering in a well-ventilated area, and spray your wreath form and snakes with black spray paint. This dark base will serve as the perfect backdrop for your snakes.
Once the black paint is dry, add metallic accents using gold, silver, or bronze spray paint. Lightly spray over certain areas of the snakes to give them a bit of sheen. You don’t want to cover the entire surface; a touch of metallic color will enhance their shape and texture, making them appear more lifelike.
If you want to go for a completely different color scheme—like neon green snakes for a radioactive look or white for a ghostly vibe—feel free to customize it to fit your desired Halloween theme.
Step 4: Attach the Snakes to the Wreath
Once your wreath form and snakes are fully dry, it’s time to start attaching the snakes. Begin by laying out your snakes in the desired arrangement before you glue them down. You can have snakes wrapping around the wreath, peeking out from behind, or even curling toward the center.
Use a hot glue gun to firmly secure the snakes in place. Apply glue to the parts of the snake that will be attached to the wreath, pressing down until the glue dries. For larger or more stubborn snakes, you may need to use floral wire to help hold them in place. Simply loop the wire around the snake and wreath, twisting it tightly at the back to hide it from view.
Vary the positioning of the snakes so they overlap and create an intricate, layered look. You can even have some of the snakes sticking out from the wreath at different angles to make the design appear more dynamic.
Step 5: Add the Final Touches
After you’ve attached all the snakes, examine your wreath to see if any spots look sparse or unfinished. If necessary, add a few more small snakes to fill in gaps or balance the overall design. You can also apply an additional coat of spray paint at this point if you feel the wreath needs more color or shine.
For a spooky final touch, consider adding faux spider webs, glitter, or tiny plastic spiders to the wreath. If you want a slightly more elegant finish, you can tie a black or metallic ribbon at the top to hang your wreath.
Step 6: Hang Your Snake Wreath
With your snake wreath complete, all that’s left is to hang it up! Use a ribbon, wreath hook, or floral wire to display your creation on your front door, above a fireplace, or anywhere else that could use a little Halloween flair.
Bonus Tips
- Lighting: Adding battery-operated LED lights around the wreath can make it glow at night, adding to the eerie atmosphere.
- Customization: Don’t limit yourself to just snakes. You can include other creepy crawlies, such as plastic spiders, centipedes, or bats, to make the wreath even more terrifying.
- Personalization: If you want to incorporate your family name or a Halloween-themed sign, attach a small wooden plaque or cut-out letters to the center of the wreath.
Conclusion
A DIY Halloween snake wreath is an easy and fun project that adds a unique, spooky touch to your holiday decor. By customizing the design with different snake arrangements and color schemes, you can create a creepy wreath that will impress trick-or-treaters and guests alike. Best of all, this project can be done in just a few hours and is budget-friendly, making it a perfect Halloween craft for all skill levels.
Check out these helpful videos!
If you enjoy the videos mentioned in this post, we encourage you to visit the creators’ channels and give them a like. Your support helps them continue to produce high-quality content and share their creative ideas with the community. By liking and subscribing to their channels, you not only show your appreciation but also stay updated with their latest projects and tips.
Happy crafting
LIKE THIS POST?
Share the link on your social media