A Step-by-Step Guide, plus more fun ideas
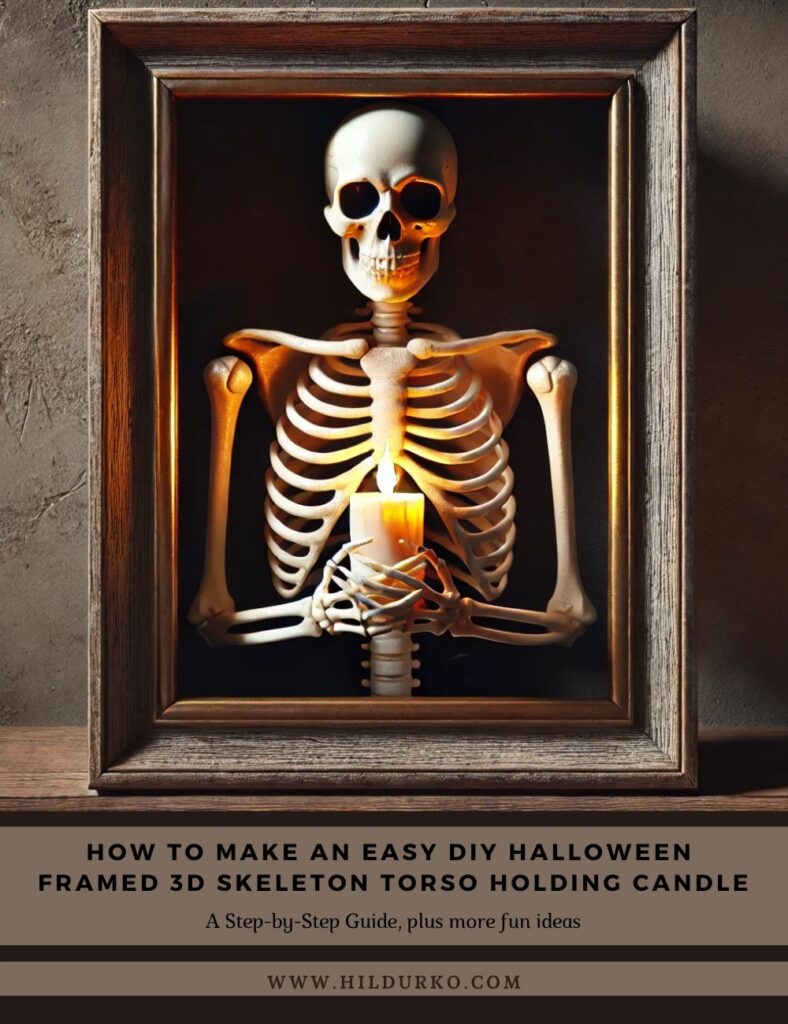
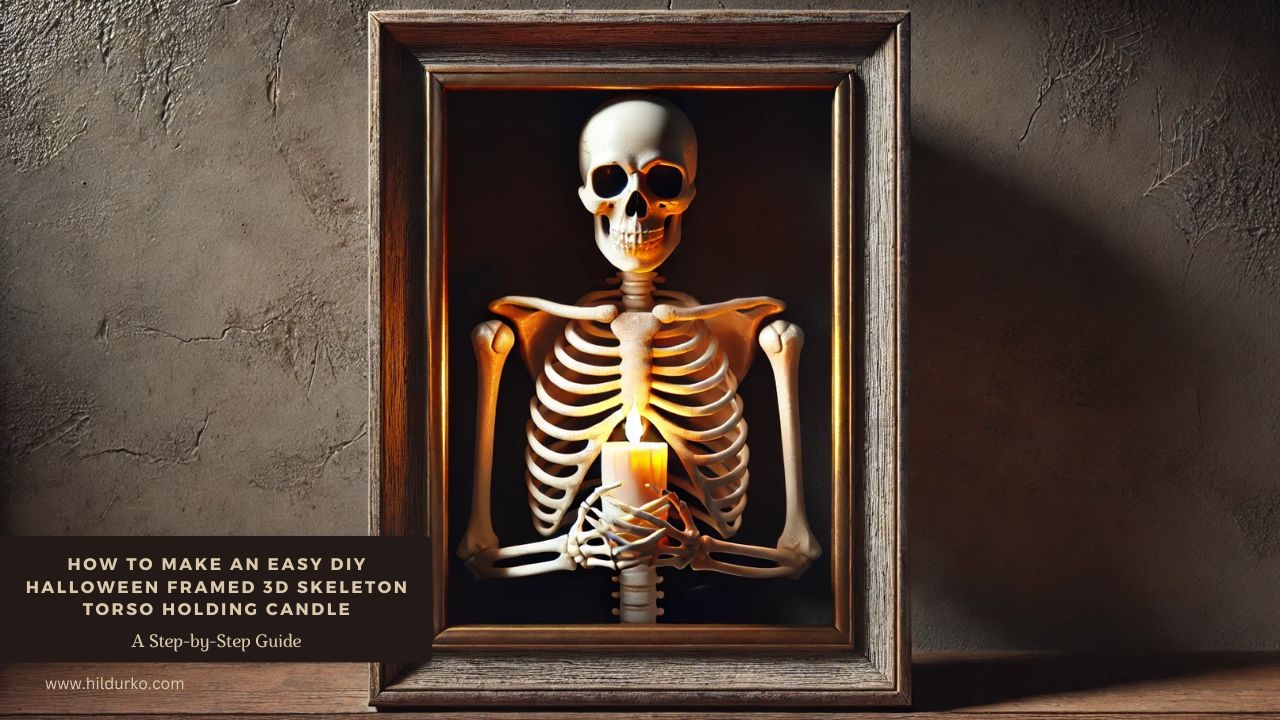
Halloween is the perfect time to get creative with your home decor, and nothing says spooky quite like skeletons and candles. One of the most eye-catching and eerie decorations is a 3D framed skeleton torso holding a flickering candle, just like the version seen on Amazon. Instead of purchasing a pre-made version, why not craft your own DIY framed skeleton? It’s a fun project, budget-friendly, and allows you to customize the look to match your Halloween theme.
This guide will walk you through the steps to create your very own DIY Halloween 3D framed skeleton torso holding a candle. With some basic supplies, you can craft this spooky decor that is sure to be a hit at your Halloween party or among trick-or-treaters.
Materials Needed:
Before you begin, gather the following supplies:
- Plastic skeleton torso (or full plastic skeleton): These can usually be found at dollar stores, party stores, or online.
- Wooden frame: Choose a rustic, weathered frame for an authentic spooky look, or paint a new frame to give it an aged appearance.
- Hot glue gun and glue sticks: For attaching the skeleton to the frame.
- Battery-operated candle: A flickering LED candle will provide a realistic glow without the safety hazard of an open flame.
- Black felt or foam board: To serve as the background inside the frame.
- Paint (optional): For distressing the frame or skeleton to give it an aged or haunted appearance.
- Decorative elements (optional): Add extra touches like faux cobwebs, small bats, or moss for more Halloween charm.
Step 1: Prepare the Frame
Start by choosing or making your frame. You can either buy a pre-made frame, use an old picture frame, or construct a simple one from wood. The size of the frame will depend on the skeleton torso you are using.
For a vintage or haunted look, consider distressing the frame. If it’s a new frame, lightly sand the edges to give it a worn appearance, or apply some black or gray paint using a dry-brush technique to make it look aged and weathered. You can also splatter it with brown or red paint for a more gruesome look if you’re going for extra spookiness.
Step 2: Create the Background
For the background, black felt or a foam board works well to help your skeleton stand out. Measure the inside of your frame and cut the felt or foam board to fit snugly. Attach it to the back of the frame with glue or tape. The dark background creates contrast and enhances the eerie look of the skeleton.
If you want to add texture, consider lightly brushing the background with gray or white paint to mimic the look of dust or old cobwebs. You could also glue faux cobwebs directly to the background to make it look even creepier.
Step 3: Prepare the Skeleton Torso
If you bought a full plastic skeleton, you’ll need to remove the legs and perhaps the lower part of the body to create a torso-only figure. Use scissors or a craft knife to carefully detach the legs, leaving only the upper body, arms, and head.
Position the arms so that they are holding the candle. Depending on your skeleton’s flexibility, you might need to snap or glue the arms in place. If the arms are stiff, consider cutting and re-gluing them in the desired position. Make sure the skeleton is holding the candle securely before moving on.
If you’d like, you can also paint or distress the skeleton to make it look older and scarier. A light brushing of black or gray paint can help enhance the bones’ texture, making them look aged and dirty.
Step 4: Attach the Skeleton to the Frame
Once the skeleton is positioned correctly and holding the candle, it’s time to attach it to the frame. Using a hot glue gun, apply glue to the back of the skeleton torso and press it firmly onto the background inside the frame. Hold it in place for a few moments until the glue sets and the skeleton is secure.
Make sure the skeleton is centered in the frame and positioned so that the candle it is holding will be in the spotlight.
Step 5: Add the Candle
Choose a battery-operated LED candle for this project. These candles are safe, long-lasting, and create a realistic flickering flame effect. Depending on the size of your skeleton, you may need to choose a smaller or larger candle to ensure it fits well in the skeleton’s hands.
Secure the candle between the skeleton’s hands using hot glue if necessary. Be sure the candle is positioned straight and is easily accessible so you can turn it on and off when needed.
Step 6: Final Touches
Once the skeleton and candle are in place, take a step back and admire your work. If it needs extra decoration, consider adding small details like faux cobwebs, spiders, or moss to the frame or skeleton. You can also add tiny plastic bats or skulls to enhance the Halloween effect.
If you want to personalize your decoration even further, you could add a small Halloween-themed plaque to the bottom of the frame or write a spooky message like “Enter if you Dare” or “Beware” using stencils or freehand lettering.
Step 7: Display Your Framed 3D Skeleton
Your DIY Halloween Framed 3D Skeleton Torso Holding Candle is now complete! All that’s left is to find the perfect spot to display it. Hang it on your front porch to greet trick-or-treaters, place it over your mantel as a haunting focal point, or add it to a gallery wall of Halloween decorations.
This spooky and unique decoration is sure to catch everyone’s attention, adding a perfect eerie touch to your Halloween setup. Plus, knowing that you crafted it yourself will make it even more special.
Conclusion
Crafting your own DIY Framed 3D Skeleton Torso Holding Candle is a fun and rewarding Halloween project that anyone can enjoy. With just a few materials and some creativity, you can create a spooky, one-of-a-kind decoration that will make your home stand out this Halloween. Whether you’re a seasoned DIYer or a beginner, this project is simple to follow and highly customizable.
Check out these great videos!
If you enjoy the videos mentioned in this post, we encourage you to visit the creators’ channels and give them a like. Your support helps them continue to produce high-quality content and share their creative ideas with the community. By liking and subscribing to their channels, you not only show your appreciation but also stay updated with their latest projects and tips.
Happy crafting
LIKE THIS POST?
Share the link on your social media