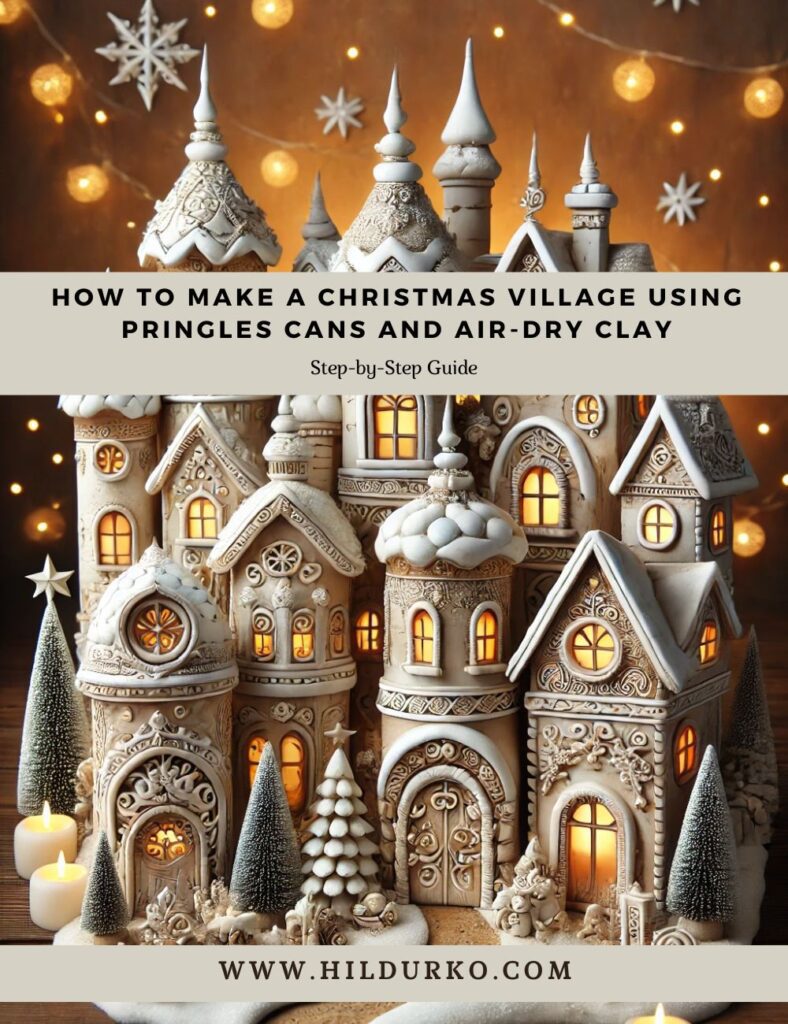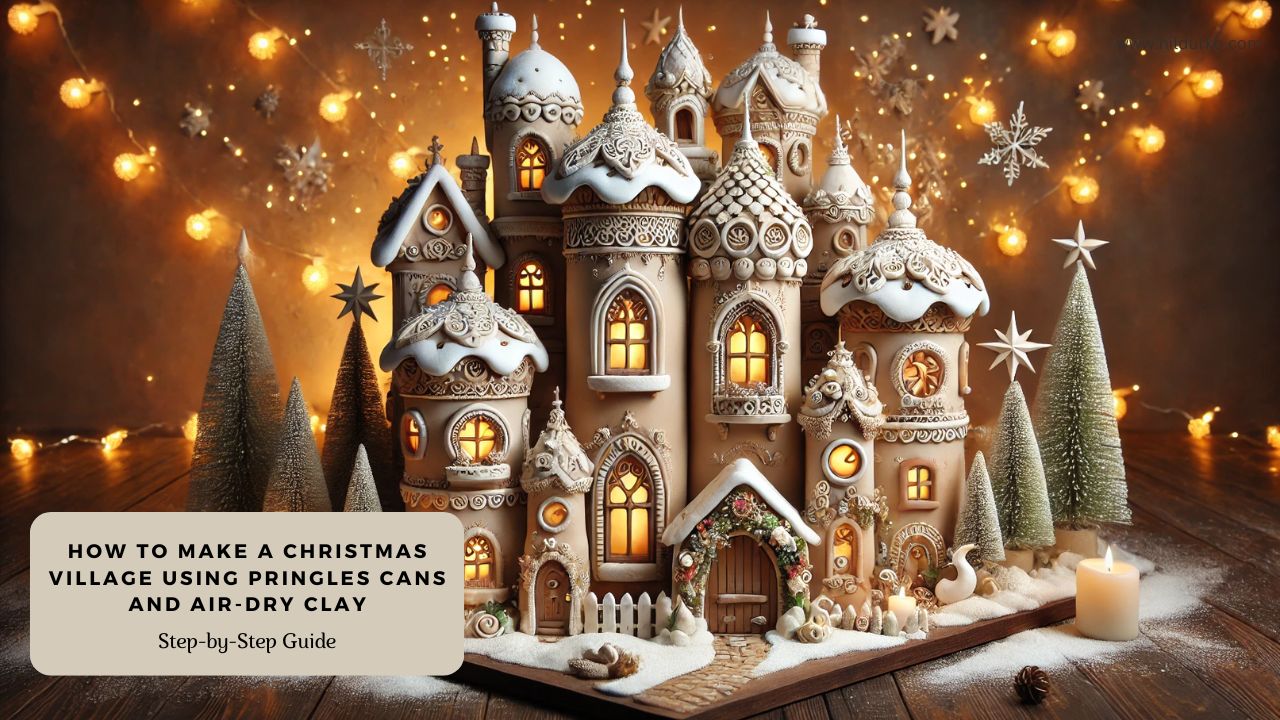
A Step-by-Step Guide
Creating a whimsical Christmas village using Pringles cans and air-dry clay is a delightful craft project that brings a touch of magic to your holiday decor. This approach adds a unique, sculpted texture to your village, allowing for intricate details and a more three-dimensional appearance. Here’s a step-by-step guide on how to craft your own charming Christmas village using these simple materials.
Materials Needed:
- Pringles cans (cleaned and dried)
- Air-dry clay (white or colored)
- Acrylic paints (various colors for detailing)
- Paintbrushes (various sizes for detail work)
- Rolling pin (for flattening clay)
- Craft knife or clay tools (for cutting and sculpting clay)
- Hot glue gun and glue sticks (for assembly)
- Fine sandpaper (for smoothing clay surfaces)
- LED tea lights or fairy lights (for illumination)
- Small embellishments (like mini wreaths, snow, glitter, etc.)
Step-by-Step Instructions:
Step 1: Prepare the Pringles Cans
Start by cleaning and drying your Pringles cans thoroughly. Remove any labels to ensure a smooth surface for attaching the clay. Decide the layout of your village by arranging the cans in different groupings to see how they will look together.
Step 2: Roll Out the Air-Dry Clay
Roll out a portion of the air-dry clay on a flat surface using a rolling pin. Aim for an even thickness of about 1/8 inch (3 mm). This will serve as the base layer to cover the Pringles cans. If you want to add some texture, you can use textured rolling pins or press a textured cloth onto the clay.
Step 3: Cover the Cans with Clay
Wrap the rolled-out clay around the Pringles cans, pressing gently to adhere it to the surface. Trim off any excess clay with a craft knife, making sure to smooth out the seams where the edges meet. Use your fingers or a small amount of water to blend the seams and create a seamless appearance. Let the clay-covered cans dry completely, which can take anywhere from 24 to 48 hours depending on the clay thickness and room humidity.
Step 4: Sculpt Details on the Buildings
Once the base layer is dry, it’s time to add details to your village buildings. Use additional clay to sculpt windows, doors, rooftops, and other architectural features directly onto the cans. For a whimsical look, you can create arched windows, ornate doors, and even textured bricks or stones. Use clay tools or household items like toothpicks and forks to add texture and fine details. Let the added clay dry thoroughly.
Step 5: Sand and Smooth the Clay
After the clay is completely dry, lightly sand the surfaces with fine sandpaper to smooth out any rough edges or uneven textures. This step is optional but recommended for a more polished finish. Be gentle to avoid breaking any small, delicate details.
Step 6: Paint Your Buildings
Once you are satisfied with the clay details, it’s time to paint your buildings. Choose festive colors like pastel pinks, blues, greens, and yellows for a whimsical fairy-tale look. Acrylic paints work best on clay as they adhere well and dry quickly. Use a fine brush for detailed areas such as window frames, doors, and roof shingles. Add shading and highlights to give depth to your buildings and make the details pop. Allow the paint to dry completely.
Step 7: Add Roofs and Decorative Elements
Create roofs using air-dry clay or craft materials like felt or paper. Cone shapes or dome-shaped roofs can be crafted with clay and attached to the top of the cans using hot glue once they are dry. Paint these roofs in contrasting colors and add details like tiles or snow effects using white paint or glitter. You can also add small embellishments like mini wreaths, garlands, or faux snow to enhance the festive feel.
Step 8: Assemble Your Village
Arrange your painted and decorated cans to form your village layout. Use a hot glue gun to secure the cans together, ensuring stability. You can stack cans of different heights to create a varied skyline, mimicking a real village setting.
Step 9: Illuminate Your Village
Place LED tea lights or fairy lights inside the cans to make your village glow. Cut out small sections of clay in the windows and doors to allow light to shine through, creating a warm and inviting ambiance. Ensure the lights are battery-operated for safety.
Step 10: Add Final Touches
To complete your Christmas village, add extra decorative touches:
- Miniature Trees and Shrubs: Place small faux trees or shrubs around your village for added realism.
- Snow Effects: Use faux snow or cotton to create snow drifts on the rooftops and ground.
- Glitter Accents: Sprinkle a light dusting of glitter on the rooftops and window sills for a frosty sparkle.
- Personalized Signs: Create small signs with holiday messages or names of the buildings using clay or paper.
Conclusion
Crafting a Christmas village from Pringles cans and air-dry clay is a wonderful way to add a unique, handmade touch to your holiday decor. This project is perfect for those who love to sculpt and paint, allowing for endless creativity and personalization. By following these steps, you can transform simple materials into a magical winter wonderland that brings joy and enchantment to your home during the festive season.
Check out these helpful videos!
If you enjoy the videos mentioned in this post, we encourage you to visit the creators’ channels and give them a like. Your support helps them continue to produce high-quality content and share their creative ideas with the community. By liking and subscribing to their channels, you not only show your appreciation but also stay updated with their latest projects and tips.
Happy crafting
LIKE THIS POST?
Share the link on your social media