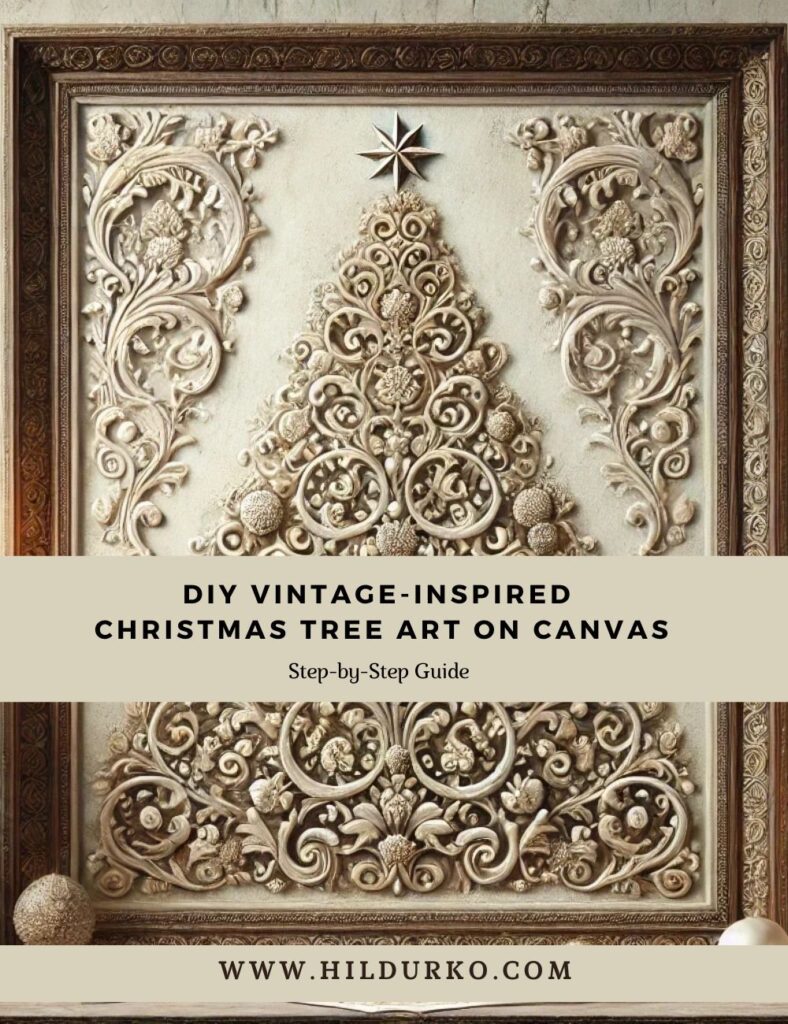
Creating a stunning vintage-inspired Christmas tree art piece can be a beautiful addition to your holiday decor. This DIY project combines elegance with a rustic charm, perfect for adding a unique and personal touch to your home during the festive season. In this step-by-step guide, we’ll walk you through how to create a raised, textured Christmas tree on a canvas, framed in a vintage-style frame.
Materials Needed:
- Canvas (size of your choice)
- Vintage-style ornate frame
- Modeling paste or texture paste
- Palette knife or spatula
- Acrylic paint (dark green and metallic gold or bronze)
- Paintbrushes (various sizes)
- Hot glue gun and glue sticks
- Decorative embellishments (optional: small beads, rhinestones, etc.)
- Sandpaper (fine grit)
- Painter’s tape
- Primer (optional, for prepping canvas)
- Silicone molds (optional, for more decorative patterns)
- Or skip any type of past or mold and simply use wood appliques and glue.
Christmas Tree Art Step-by-Step Instructions:
Step 1: Prepare Your Canvas
Start by preparing your canvas. If you are using a raw canvas, you might want to prime it first to create a smooth surface for the paint. Apply a layer of gesso or primer and let it dry completely. If you’re working with a pre-primed canvas, you can skip this step.
Step 2: Paint the Background
Once your canvas is ready, use a paintbrush to apply a coat of dark green acrylic paint over the entire surface. This color will serve as the background for your Christmas tree. Make sure to paint the edges of the canvas as well for a finished look. Allow the paint to dry completely before moving on to the next step.
Step 3: Create the Tree Outline
Using a pencil, lightly sketch the outline of a Christmas tree in the center of the canvas. This outline will act as a guide for where you’ll be applying the modeling paste. If you’re not confident in free-handing the tree, you can create a stencil by drawing a tree on a piece of paper, cutting it out, and then tracing it onto the canvas.
Step 4: Apply the Modeling Paste
Now, it’s time to create the raised texture for the tree. Using a palette knife or spatula, scoop out some modeling paste and start applying it within the tree outline. Spread the paste evenly, building up a thick layer that resembles the branches and foliage of a Christmas tree. You can create texture by using the edge of the palette knife to make small strokes, giving the appearance of pine needles.
As you apply the modeling paste, focus on creating dimension. Make some areas thicker and others thinner to mimic the natural look of a tree. This step may take some time, but the more texture you create, the more dynamic your tree will appear.
Optional: Use Silicone Molds or Wood Appliques for Decorative Patterns
For those looking to add more intricate details to their tree, silicone molds or wood appliques are fantastic options. Silicone molds allow you to fill them with modeling paste, creating detailed shapes that can be carefully placed onto your canvas. Alternatively, wood appliques, which are pre-made decorative wooden pieces, can be glued directly onto the canvas to form the shape of a tree or add decorative accents. Both options provide a unique and ornate touch to your artwork.
Step 5: Let It Dry
Allow the modeling paste to dry completely. This can take a few hours or overnight, depending on the thickness of the paste and the humidity of your environment. It’s important to ensure that the paste is fully dried before moving on to painting, as wet paste can smudge and lose the texture you’ve carefully created.
Step 6: Paint the Tree
Once the modeling paste is fully dry, it’s time to add some color and bring your tree to life. Start by painting the entire tree with metallic gold or bronze acrylic paint. Use a smaller brush to get into all the nooks and crannies of the textured surface.
After the first coat is dry, you can add more layers if necessary to achieve the desired depth and richness of color. Feel free to mix metallic colors for added dimension, using lighter golds and darker bronzes to highlight different parts of the tree.
Step 7: Add Finishing Touches
For an extra vintage flair, consider adding small decorative embellishments to your tree. Using a hot glue gun, you can attach tiny beads, rhinestones, or even small pieces of jewelry to the tree. These embellishments will catch the light and add a bit of sparkle to your artwork.
If you want to age the piece for an antique look, gently sand some areas of the frame or the raised parts of the tree to reveal hints of the base color underneath.
Step 8: Frame Your Canvas
Once you’re happy with the look of your tree, it’s time to frame it. Place your canvas into the vintage-style frame. If the frame doesn’t come with a back, you may need to secure the canvas with nails or use an adhesive to keep it in place.
Step 9: Display Your Artwork
Your vintage-inspired Christmas tree art is now complete! Find a prominent place in your home to display your masterpiece. Whether hung above a mantle or placed on a sideboard, this unique piece is sure to add charm and warmth to your holiday decor.
Tips and Variations:
- Color Variations: Experiment with different background colors like deep reds or midnight blues for a different holiday feel.
- Embellishments: Consider adding glitter or using metallic leaf for an even more opulent finish.
- Silicone Molds: Use various silicone molds to create detailed decorative patterns, adding a personalized touch to your tree.
- Frame Style: The frame plays a significant role in the overall aesthetic. Choose one that complements your home decor or enhances the vintage look.
This DIY project not only allows for creativity but also adds a personalized touch to your Christmas decorations. Enjoy the process, and happy crafting!
Looking for guidance on how to use modeling paste and similar mediums? Check out these helpful videos!
If you enjoy the videos mentioned in this post, we encourage you to visit the creators’ channels and give them a like. Your support helps them continue to produce high-quality content and share their creative ideas with the community. By liking and subscribing to their channels, you not only show your appreciation but also stay updated with their latest DIY projects and holiday decoration tips.
LIKE THIS POST?
Share the link on your social media
or pin the image below to your Pinterest board!


